I finished J’s second pair of pants on Tuesday night and stayed up so late to finish them that I was zonked and went to bed early last night. So pair #3 is sitting in my sewing room almost half done. Oh well, I’ll finish them tonight!
I took Albert’s suggestion and added some more “boy” details to this pair even though that meant they took longer than the purple pair. And they did turn out really cute:
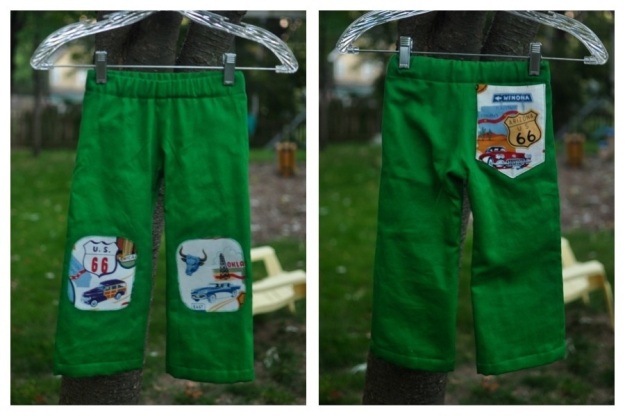
Preemptively patching the knees was probably a good idea. I don’t think J owns a single pair of pants that hasn’t ended up with knee patches. It’s WAY easier to do that on the front end!
I mentioned before that all of the pants I’m making for J this week are lined. The weather is getting chilly here and while we in Kansas rarely get the arctic-like winter that I grew up with in Iowa, it is proving to be unseasonably cold this fall. I guess this will be a year of extremes! I figured that lining these pants couldn’t hurt.
It is so easy to line a basic pair of kids’ pants (since there usually aren’t zip flies etc to worry about). I love the lined look because in addition to warmth, it hides all of the interior seam allowances!
I lined these green twill pants with a gray flannel that was sitting around in my stash. I picked it up in the remnants bin at Joann’s ages ago and it was just the right amount of fabric for a lining! Since the purple pants were corduroy, which is already a slightly heavier fabric, I used jersey to line those. Even quilting cotton would work if you wanted a pop of pattern inside the pants, but I like the softness of knits or flannel.
So here is a mini-tutorial on how I lined these pants for J. I’m sure there are several ways to line a pair of pants, and I don’t claim that mine is the only, or even the best, way. It’s just the way that made sense to me when I sat down to puzzle this out. Also, this is the first time I’ve ever put together a tutorial of any kind, so I’m very open to any constructive criticism you may have! (Please keep it constructive though, this is my happy place).
How to line a basic pair of kids pants:
Step 1: Sew the crotch seams, side seams and inseams on the pants in both your outer fabric and lining fabric. I won’t go through the steps on how to do this. I used the MADE basic kids pants pattern for J’s pants, and Dana has detailed instructions on how to assemble the pants here. (Dana also did a tutorial on lining pants. I didn’t use that tutorial, so I’m doing my own, but hers can be found here).

Step 1: Construct your pants. I did the patches and pocket on my outer pants at this stage so all the interior stitching would be hidden.
The basic kids pants pattern doesn’t have any pockets or a separate waistband piece. You could easily line pants that have pockets, though, and all of the interior pocket pieces would be sandwiched between the outer fabric and the lining, maintaining that nice, smooth, soft interior! To do that, you would assemble the outside pieces, including the pockets, to the point where you were going to add waistband and hems. Assemble the inside pieces without any pockets, and continue from there.
Step 2: Turn the outer pants piece inside out and iron under your hems and waistband on the outer piece only. For my waistbands, I ironed them under 1/2 inch, and then again about 1 1/4 inches all around. I wanted to maintain length in the legs, so I ironed under 1/2 inch then another 1/2 inch.

Step 2: Iron the waistband and hems on the outer piece
Step 3: Stuff the outer pants piece inside the lining piece, wrong sides together. Keep the waistband and hems folded under when you stuff the outer piece into the lining piece.

Step 3: Stuff the outer pants inside the lining piece.
Step 4: Trim the lining pieces at the waistband and legs so that they are about 1/4 inch shorter than the outer piece with the waistband and hems folded.

Step 4: Trim the lining.

Step 4: Trimming the lining — see how the lining is just a tad shorter than the folded waistband?
Step 5: Tuck the top and bottom of the lining piece underneath the folded waistband and hems and pin in place. Be sure to smooth everything out and line up your seams here. This is the time to insert a back tag, if you have one, or a piece of ribbon or twill tape. I used a scrap of twill tape so we’d know which side is the back.

Step 5: Tuck the lining inside the waistband and hems.
Step 6: Sew the waistband casing and hems, leaving a 2-inch gap on one side of the waistband casing.

Step 6: Sew the waistband casing and hems.
Step 7: Insert your elasic at the gap you left and pull it through the casing. Attach the ends. For J’s pants, I cut a 20″ piece of elastic and counted on a 1/2-inch of overlap when I sewed it together for a final waist circumference of 19″.

Step 7: Insert elastic into the waistband.
Step 8: Sew the waistband casing shut.
And you’re done! Comfy, cozy lined pants with no exposed interior seam allowances! Now go try them on your little guy or gal (or leave them on the sofa until morning because it’s 11:30 pm and the little guy or gal has been in bed for 4 hours and you should be sleeping too. I’ve never done that, though. Ahem. Really.).
Here’s my finished interior:

And my patches and pockets:

J was a fan! He loved the cars all over his pants, and informed me that they were nice and soft!


